Environments and properties
Environments let one request work against several deployments — local, staging, production —
without editing the URL or the body each time. You set variables once, in a scope, and reference
them with ${...} inside URLs, headers, envelopes and bodies. The syntax itself, and the full
precedence rules, are covered in
Property expansion syntax; this page is about managing
environments day to day.
Open the Environments view
Section titled “Open the Environments view”Choose Environments in the activity bar. It lists Globals, Workspace, and every environment you’ve added — both workspace-level environments and any linked project’s own. Each entry opens a page with a table of variables.
Scopes, from broadest to narrowest
Section titled “Scopes, from broadest to narrowest”- Globals — available everywhere, referenced as
${#Global#name}. The broadest scope; a workspace or environment variable with the same name wins over it. - Workspace — available to every project in the workspace, as
${#Workspace#name}. An active environment’s variable of the same name wins over it. - Environment — the variables of whichever environment is active, as
${#Env#name}. This is the scope you switch between deployments with.
The shorthand ${name} (no #Scope#) resolves through Env, then Workspace, then Global —
whichever scope defines it first.
Add and switch environments
Section titled “Add and switch environments”- In the Environments view, choose Add environment. It opens on the new environment’s page with a default name.
- Click the name to rename it, or right-click the row and choose Rename. Press Enter to commit, Escape to cancel.
- To make it the one requests use, open the environment switcher in the status bar and choose it from the list.
Only one environment is active at a time. The status bar always shows which one, and every open request tab picks it up immediately — there’s no per-tab environment.
Set variables
Section titled “Set variables”Each scope’s page (Globals, Workspace, or an environment) has its own table: name, value, and a Secret flag.
- Add a row and type a name and value.
- Turn on Secret for anything sensitive — a token, a password, an API key. See Secrets for how secret values are stored and masked.
- Reference it anywhere property expansion is read — the address bar, headers, a JSON body, a
SOAP envelope — with
${#Env#name},${#Workspace#name},${#Global#name}, or the shorthand${name}.
An unresolved reference — a typo, or a variable that only exists in a different environment —
shows up as a row in Problems when you send, naming the exact ${...} text it couldn’t
resolve.
Disable a variable without deleting it
Section titled “Disable a variable without deleting it”Every row has an enabled checkbox. Unticking it makes property expansion treat the variable as absent — a reference to it falls through to the next scope in the precedence chain (or is left unresolved if nothing else defines it) — while its value stays saved. This is the quickest way to try a request without a variable, or to keep a rarely used value around without deleting it.
Current values
Section titled “Current values”Every variables table — Globals, Workspace, a project and each environment — has a Current
column beside Value. A current value replaces the committed value for this session only: the store
is never written to the project, the workspace or the keychain, and it is gone when you quit. A
request that is sent records what it sent, in History and the HTTP Log, as it would for a committed
value: keep credentials in ${secret:…} references.
- An empty Current cell shows the committed value as a placeholder; that value applies.
- Type into the cell and press Enter to set a current value. The variable’s name gets a dot, and every send, preview and the code panel use the current value.
- Empty the cell, or enter the committed value, to go back to it. The reset button in a row resets that variable; Reset current values in the column header resets the whole table.
- A disabled variable stays absent; its current value does not apply.
- A current value may itself contain
${...}, which is expanded like any other value. - Rename a variable and its current value follows; delete it and the current value goes too.
- A secret’s Current cell is masked like its Value until you show secrets.
- Current values don’t exist on the command line;
--varplays that part.
Endpoint overrides
Section titled “Endpoint overrides”An environment’s page also has an Endpoints table, one row per SOAP interface and REST or gRPC API the workspace can reach. Filling in a row redirects every request under that interface or API to the address you type, instead of the one the WSDL or the API’s own base URL declares — useful for pointing an imported definition at a different deployment of the same service.
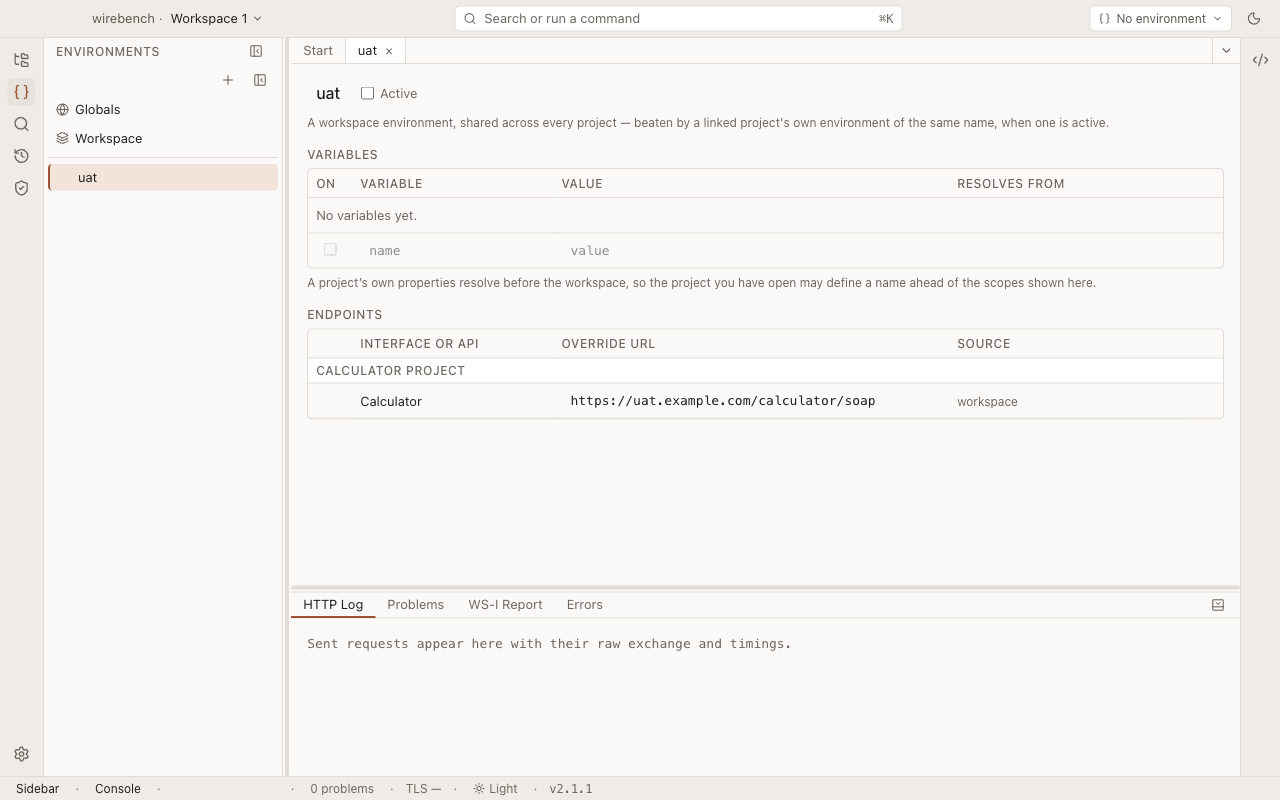
A row shows which layer is currently winning when more than one could apply — for example, a linked project’s own environment override beats a workspace environment’s override for the same interface. A request sent under an overridden interface shows a badge next to its endpoint field so you can tell, without opening Environments, that something is redirecting it.
Send to several environments
Section titled “Send to several environments”To check that a request behaves the same on dev, test and prod, send it to all of them at once instead of switching the active environment between sends. This works for SOAP and REST requests.
- In the request’s editor, choose Environments… next to Send, or run Request: Send to Environments… from the command palette.
- Tick the environments to send to — two or more, up to ten. The active environment starts ticked.
- Choose a Baseline: the environment the others are compared against. It defaults to the active environment.
- Choose Send.
The environments offered are the workspace’s — the same ones the environment switcher lists and that decide where a normal send goes. A project’s own environment takes part only through the workspace environment it is linked to. With fewer than two workspace environments the action is unavailable, and its tooltip says why.
Each environment gets the request exactly as a normal send with that environment active would build it — its endpoint override or base URL, its variables, its auth and TLS settings — and your unsaved edits go with every one. The sends run in parallel, and the active environment does not change. One environment failing (an unresolved property, no endpoint, a refused connection) does not stop the others; Cancel stops the ones still running and opens no Compare tab. While a comparison runs, a second one for the same request cannot be started. The picker remembers your last selection for each request until you close the app.
The results open in a Compare tab:
- one column per environment, the baseline marked, with the URL it went to, the status, the time, the size and the response body;
- a line per other environment reading same body, body differs, status differs or failed against the baseline, so a wide comparison can be read at a glance;
- below, the baseline diffed against one other environment, chosen from a list: response headers side by side, then the two bodies in a diff editor. Bodies are pretty-printed first, so a difference in formatting alone is not reported as a change.
Every individual send is also recorded in History and the HTTP Log, one entry per
environment — closing the Compare tab loses nothing. A History entry reads
<request> · <environment>; in the HTTP Log, tell the rows apart by the URL each one went to.
Related
Section titled “Related”- Property expansion syntax — the full
${...}grammar and resolution order. - Secrets — how secret variables are stored and what never leaves your machine.
- SOAP and WSDL and REST — where endpoints and base URLs come from.